If you just want to prep for Oral Exam, go directly to the Progress Check to test your knowledge on the IALA Buoyage system.
Introduction to the IALA Buoyage System
The International Association of Marine Aids to Navigation and Lighthouse Authorities (IALA) Buoyage System is a globally standardized system of navigation marks that ensures maritime safety worldwide. Prior to 1980, more than 30 different buoyage systems existed around the world, leading to confusion and tragic maritime accidents.
In 1971, the merchant ships Brandenburg and Niki sank in the English Channel after striking recent, well-marked wrecks, resulting in the loss of 51 lives. This catastrophe prompted the international maritime community to establish a unified buoyage system.
The IALA Solution
IALA developed a comprehensive system divided into two regions to accommodate historical navigation practices while maintaining safety standards:
- Region A: Europe, Africa, Australia, New Zealand, Middle East, and most of Asia
- Region B: Americas, Japan, South Korea, Philippines, and Taiwan
As Australia is in Region A, this training focuses exclusively on IALA-A characteristics.
Purpose of the IALA Buoyage System
The system serves to:
- Mark navigable channels and indicate safe water
- Identify hazards and dangers to navigation
- Provide consistent, recognisable navigation aids worldwide
- Enable mariners to determine their position and safe passage
- Reduce maritime accidents through standardised communication
The Six Types of Marks
The IALA system consists of six distinct mark types, each with specific colors, shapes, topmarks, and light characteristics:
Mark Type |
Primary Purpose |
Color |
Example |
|---|---|---|---|
Lateral Marks |
Mark channel edges (port/starboard) |
Red (port) / Green (starboard) |
 |
Cardinal Marks |
Indicate safe water by compass direction |
Black and Yellow |
 |
Isolated Danger Marks |
Mark isolated hazards with safe water around |
Black with Red bands |
 |
Safe Water Marks |
Indicate safe water all around (mid-channel) |
Red and White vertical stripes |
|
Special Marks |
Indicate special areas or features |
Yellow |
 |
Emergency Wreck Marks |
Mark newly discovered wrecks/hazards |
Blue and Yellow vertical stripes |
 |
Important: Lateral marks are the ONLY marks that differ between IALA Region A and Region B. All other marks maintain the same characteristics worldwide.
Understanding Mark Characteristics
Each navigation mark is identified by a combination of four key characteristics:
- Color: The painted color scheme of the mark
- Shape: Physical shape (pillar, spar, can, cone, sphere)
- Topmark: The distinctive shape mounted on top of the mark
- Light Characteristic: The pattern and color of light displayed at night
Always consult your nautical chart to confirm mark identification and understand local conditions.
1. Lateral Marks
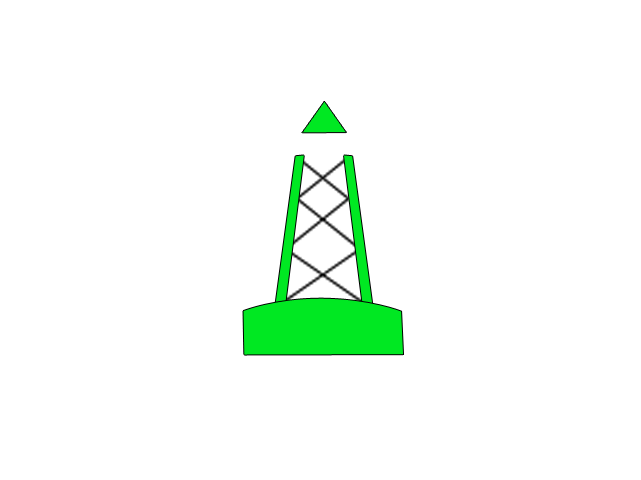
Lateral marks indicate the port (left) and starboard (right) sides of navigable channels. The term “lateral” means “side,” and these marks show mariners which side of the channel to navigate.
Understanding Direction of Buoyage
The direction of buoyage is critical for correctly interpreting lateral marks. It is defined as:
- When entering harbors: From sea toward the harbor
- When traveling rivers: Upstream toward the river’s source
- Along coasts: Generally clockwise around continents (in the direction that would take you into major harbors)
Chart Reference: When there may be doubt about the direction of buoyage, it will be clearly marked on your nautical chart using the symbol: ➔
IALA Region A – Lateral Mark Characteristics
Characteristic |
Port Lateral Mark |
Starboard Lateral Mark |
|---|---|---|
Marker |
 |
|
Color |
Red |
Green |
Shape |
Can (cylindrical) or Pillar with flat top |
Cone (conical) or Pillar with pointed top |
Topmark |
Single red cylinder (can shape) – if fitted |
Single green cone (point up) – if fitted |
Light Color |
Red (if lit) |
Green (if lit) |
Light Rhythm |
Any rhythm EXCEPT Fl(2+1) |
Any rhythm EXCEPT Fl(2+1) |
Numbering |
Even numbers (if numbered) |
Odd numbers (if numbered) |
How to Navigate Lateral Marks
When Proceeding IN THE DIRECTION of Buoyage (Entering Harbor/Going Upstream):
- Keep RED PORT marks on your PORT (left) side
- Keep GREEN STARBOARD marks on your STARBOARD (right) side
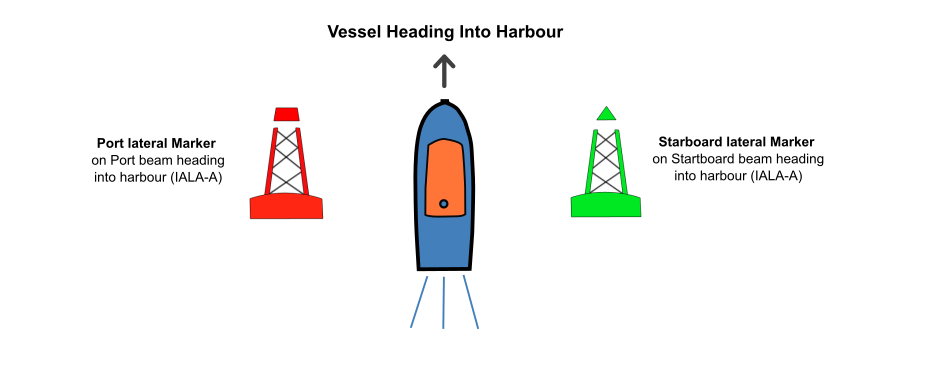
When Proceeding AGAINST the Direction of Buoyage (Leaving Harbor/Going Downstream):
- Keep RED PORT marks on your STARBOARD (right) side
- Keep GREEN STARBOARD marks on your PORT (left) side
Preferred Channel Marks (Modified Lateral Marks)
When a channel divides or splits, preferred channel marks indicate the recommended route. These are lateral marks with an additional horizontal band of the opposite color:
Main Channel Direction |
Color Scheme |
Meaning |
Example |
|---|---|---|---|
Straight ahead, with secondary channel to PORT |
Red with GREEN horizontal band in middle |
Preferred channel: Keep to starboard (treat as port mark for main channel) |
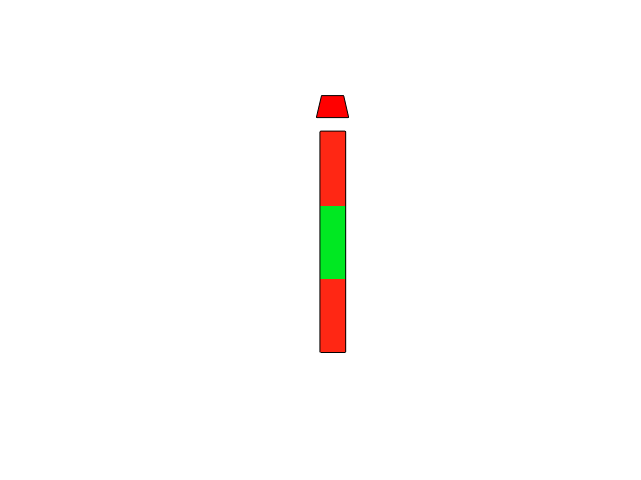 |
Straight ahead, with secondary channel to STARBOARD |
Green with RED horizontal band in middle |
|
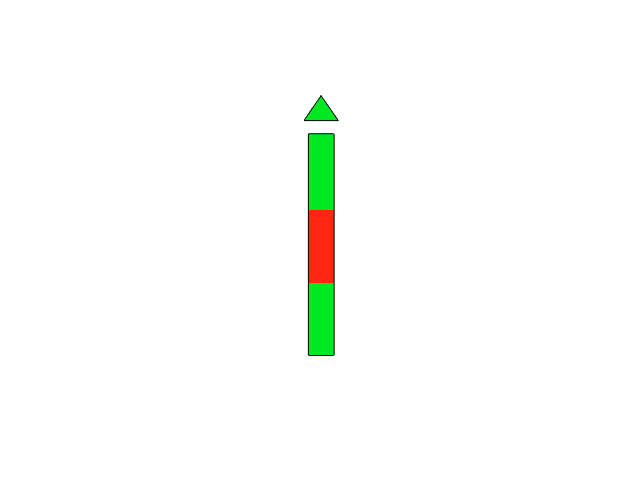 |
Light Characteristics
Lateral marks may display various light rhythms to aid identification:
- Flashing (Fl): Single flash at regular intervals – longer darkness than light
- Quick Flashing (Q): 50-60 flashes per minute
- Very Quick Flashing (VQ): 100-120 flashes per minute
- Composite Group Flashing (2+1): RESERVED for preferred channel marks only
Critical Note: Lateral marks are NOT always in pairs. When you encounter a single lateral mark, you must consider the direction of buoyage to determine which side to pass.
Common Lateral Mark Applications
- Marking harbor approaches and entrances
- Defining navigable channels in rivers and estuaries
- Indicating safe passage through reef systems
- Marking dredged channels in shallow waters
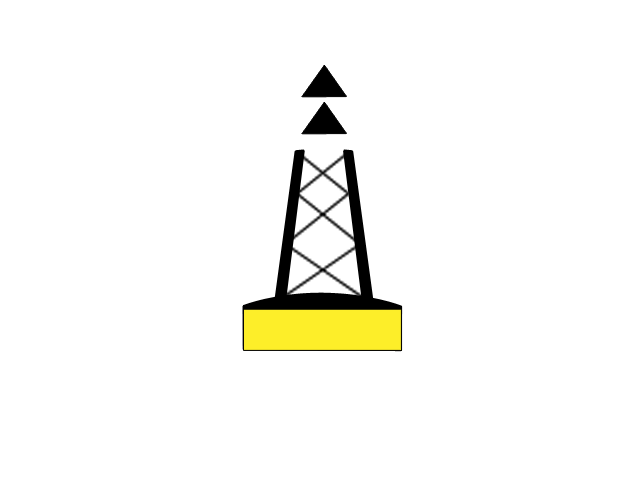
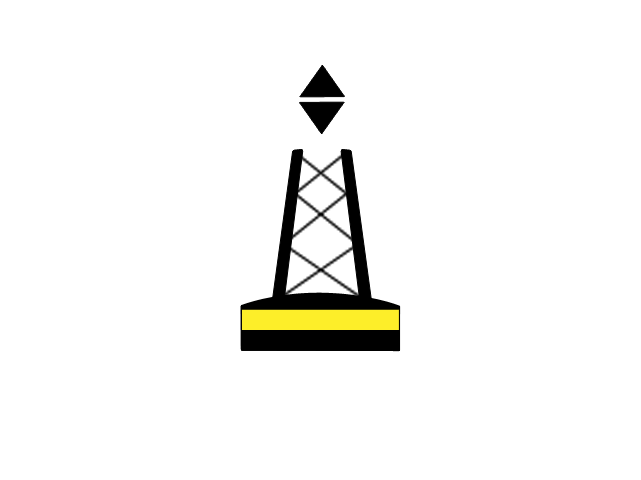
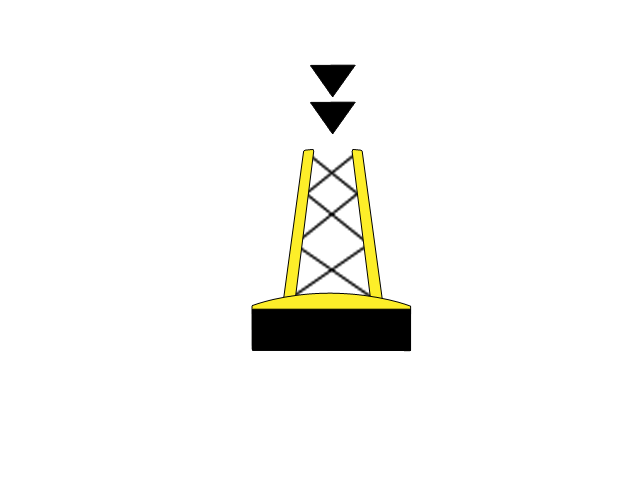
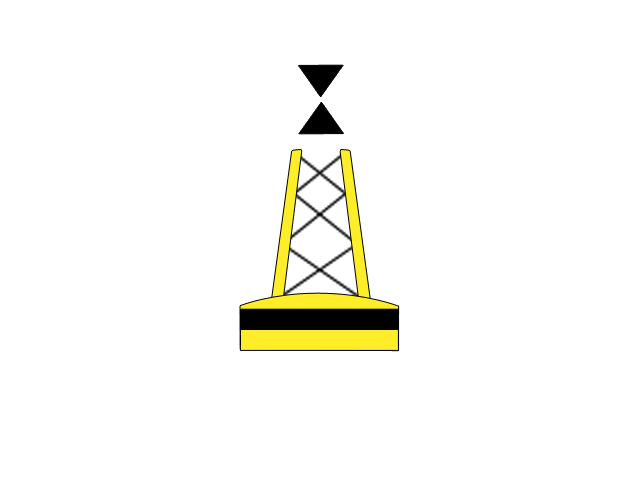
2. Cardinal Marks
Cardinal marks are named after the four cardinal points of the compass (North, East, South, West) and indicate the direction where safe water lies relative to the mark or point of interest. Unlike lateral marks, cardinal marks are meaningful regardless of the vessel’s direction of travel or position.
When to Use Cardinal Marks
Cardinal marks are used to:
- Indicate that the deepest or safest water is on the named side of the mark/point of interest
- Draw attention to hazards such as bends, junctions, or bifurcations in channels
- Mark the end of shoals or shallow areas
- Identify new dangers (sometimes doubled up for emphasis)
- Mark areas where lateral marks would be confusing or inappropriate
Navigation Rule: Always pass on the NAMED SIDE of a cardinal mark. If you see a North Cardinal Mark, safe water is to the NORTH – navigate north of the mark.
Cardinal Mark Characteristics – Complete Table
Feature |
North Cardinal |
East Cardinal |
South Cardinal |
West Cardinal |
|---|---|---|---|---|
Marker |
 |
 |
 |
 |
Safe Water Direction |
NORTH of mark |
EAST of mark |
SOUTH of mark |
WEST of mark |
Color Pattern (top to bottom) |
Black above Yellow |
Black – Yellow – Black |
Yellow above Black |
Yellow – Black – Yellow |
Topmark (2 cones) |
Both points UP ▲▲ |
Points away from each other (base to base) ▲▼ |
Both points DOWN ▼▼ |
Points toward each other (point to point) ▼▲ |
Light Color |
White |
White |
White |
White |
Light Rhythm |
Q or VQ (Continuous) |
Q(3) or VQ(3) every 10s (or 5s) |
Q(6)+LFl or VQ(6)+LFl every 15s (or 10s) |
Q(9) or VQ(9) every 15s (or 10s) |
Clock Face Memory Aid |
12 o’clock – Continuous |
3 o’clock – 3 flashes |
6 o’clock – 6 flashes + long |
9 o’clock – 9 flashes |
Understanding the Design Logic
Color Pattern Logic: The black bands always appear where the topmark cones point.
- North: Cones point UP → Black at TOP
- South: Cones point DOWN → Black at BOTTOM
- East: Cones point OUTWARD → Black at TOP and BOTTOM (outside)
- West: Cones point INWARD → Black in MIDDLE
Memory Aids for Cardinal Marks
Light Pattern – Clock Face Method:
Imagine standing in the center of a clock face. The cardinal direction corresponds to the hour position:
- North (12 o’clock): Continuous flashing
- East (3 o’clock): 3 flashes
- South (6 o’clock): 6 flashes + 1 long flash
- West (9 o’clock): 9 flashes
Why the South Mark Has a Long Flash
The South cardinal mark includes a long flash (minimum 2 seconds) after its 6 quick flashes. This prevents confusion with the 3 or 9 flashes of East and West marks, especially in difficult conditions where counting quick flashes can be challenging.
Quick vs. Very Quick Flashing
| Light Type | Flashes per Minute | Use Case |
|---|---|---|
| Quick Flashing (Q) | 50-60 | Standard cardinal marks |
| Very Quick Flashing (VQ) | 100-120 | Used when two similar marks are nearby to distinguish them |
Shape of Cardinal Marks
Cardinal marks are typically:
- Pillar buoys: Tall, vertical structures
- Spar buoys: Pole-like markers
The topmark (two black cones) is the most important daytime identifier and should be as large as possible with clear separation between the cones.
Practical Navigation Examples
Example 1 – Submerged Rock:
A rock lies just below the surface. A West Cardinal mark is positioned near it. Safe water is to the WEST of the mark, meaning the hazard is to the EAST. You should pass to the west of the mark.
Example 2 – Channel Bend:
An East Cardinal mark is placed at a sharp bend. This indicates that safe, deep water lies to the EAST of the mark – steer eastward when you see this mark.
Example 3 – Shoal End:
A North Cardinal mark indicates the northern end of a shoal. Navigate to the NORTH of this mark to stay in safe water.
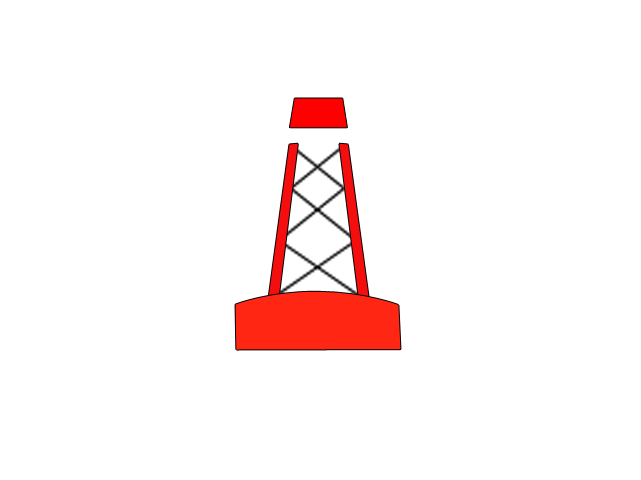
3. Isolated Danger Marks
Isolated danger marks are positioned on, above, or very close to isolated hazards of limited extent that have navigable water all around them. These marks warn mariners of specific dangers such as submerged rocks, wrecks, or small shoals that are surrounded by safe water.
Characteristic |
Description |
|---|---|
Marker |
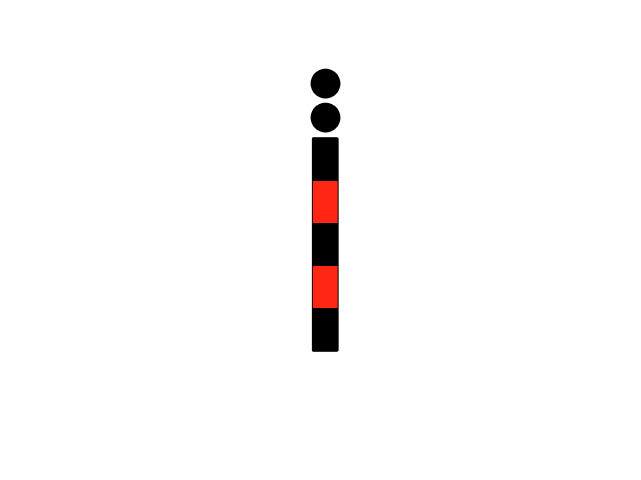 |
Primary Color |
Black |
Band(s) |
One or more broad horizontal RED bands |
Shape |
Pillar or Spar (shape not critical for identification) |
Topmark |
Two BLACK SPHERES, one above the other (vertically stacked) |
Light Color |
White (if fitted) |
Light Rhythm |
Group Flashing (2) – abbreviated as Fl(2) |
Light Period |
Critical Differences from Other Marks
| Feature | Isolated Danger Mark | Cardinal Mark |
|---|---|---|
| Safe Water Location | ALL AROUND the mark | Only on the NAMED SIDE |
| Mark Position | ON or ABOVE the hazard | NEAR the hazard, indicating direction |
| Colors | Black with Red bands | Black and Yellow bands |
| Topmark | Two BLACK SPHERES (vertical) | Two BLACK CONES (various orientations) |
| Light Pattern | Fl(2) – white | Q or VQ in specific patterns |
Chart Representation
On nautical charts, the position of a danger is marked at the center of the hazard symbol or sounding. Because an isolated danger mark is necessarily positioned slightly offset from the exact center (it’s placed ON the danger, not floating above the chart’s plotted center), the mark’s position on the chart may appear slightly displaced from the hazard symbol.
Practical Examples
Example 1 – Offshore Rock:
A submerged rock lies 2 nautical miles offshore in otherwise deep water. An isolated danger mark with two black spheres sits above it, displaying Fl(2) white light at night. Mariners can safely navigate around this mark on any side, maintaining appropriate clearance as indicated on the chart.
Example 2 – Wreck Site:
A sunken vessel lies in a shipping lane. An isolated danger mark (black with red band, two sphere topmark) is moored directly over the wreck site. Vessels should give this mark a wide berth but can pass on any side according to their course.
4. Safe Water Marks
Safe water marks indicate that there is navigable water all around the mark. They are commonly used as mid-channel markers, center-line buoys, or landfall marks when approaching from seaward. These marks provide positive indication of safe water and guide vessels along the safest route.
Key Characteristics
Characteristic |
Description |
|---|---|
Marker |
|
Color Pattern |
RED and WHITE VERTICAL STRIPES |
Shape |
Spherical (preferred), Pillar, or Spar |
Topmark |
Single RED SPHERE (whenever practicable on pillar/spar) |
Light Color |
White (if fitted) |
Light Rhythm Options |
• Isophase (Iso) – equal light and dark |
Typical Period |
10 seconds for Long Flash (LFl 10s) |
Unique Identifier: Safe water marks are the ONLY marks in the IALA system with VERTICAL STRIPES. This makes them instantly recognisable and distinguishable from danger marks which use horizontal bands.
Common Applications
| Application | Purpose | Example |
|---|---|---|
| Mid-Channel Marks | Mark the centerline of navigable channels | Brisbane River entrance channel centerline |
| Landfall Buoys | First mark encountered when approaching from seaward | Harbor approach buoy 5 nautical miles offshore |
| Fairway Marks | Indicate the fairway or main approach route | Port entry fairway marker |
| Channel Forks | Mark safe water at channel bifurcations | Junction point where channels divide |
Understanding Light Characteristics
Safe water marks use distinctive white light patterns that differ from other marks:
Light Pattern Definitions:
- Isophase (Iso): Light and dark periods are exactly equal in duration
- Occulting (Occ): Light is ON longer than it is OFF (opposite of flashing)
- Long Flash (LFl): A single flash lasting 2 seconds or more
- Morse “A” (• —): Short flash followed by long flash (dit-dah)
Critical Navigation Difference:
• Safe water marks: You CAN and SHOULD navigate close to these marks – they mark safe channels
• Isolated danger marks: You MUST keep clear – they mark hazards
Practical Navigation Examples
Example 1 – Landfall Navigation:
A vessel approaching Sydney Harbour from the open ocean encounters a large spherical buoy with red and white vertical stripes showing an isophase white light. This safe water mark indicates the beginning of the safe approach channel. The vessel should head toward this mark and use it as a reference point for entering the channel.
Example 2 – Mid-Channel Guidance:
A series of safe water marks (red/white vertical stripes) runs down the center of a dredged channel. Vessels should follow these marks to stay in the deepest, safest water, especially important for deep-draft vessels.
Example 3 – Channel Junction:
At a point where two channels meet, a safe water mark indicates that navigable water is available in all directions from this point. Vessels can choose their route based on their destination, knowing the water is safe around this mark.
Chart Symbols and Abbreviations
On nautical charts, safe water marks are typically indicated with:
- Red and white striped symbol
- Sphere or buoy shape symbol
- Light characteristic notation (e.g., “Iso W 10s” or “LFl W 10s”)
- Name or number if applicable
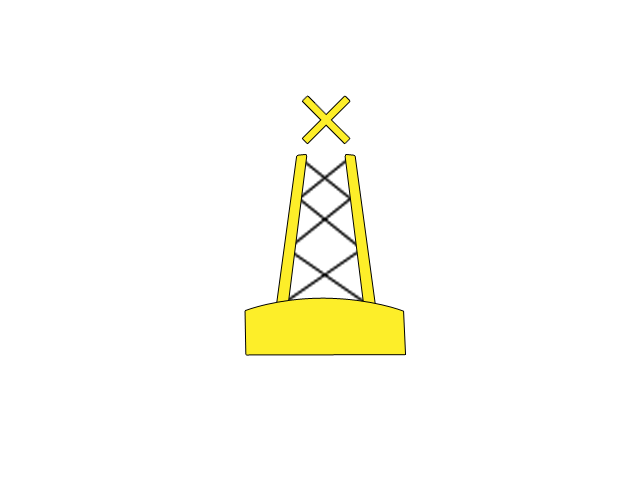
5. Special Marks
Special marks are not primarily aids to navigation in the traditional sense. Instead, they indicate special areas or features whose nature can be determined by consulting nautical charts or other maritime publications. These marks provide information rather than warn of dangers or mark channels.
Key Characteristics
Characteristic |
Description |
|---|---|
Marker |
 |
Color |
YELLOW (entire mark) |
Shape |
Optional – can be any shape (Can, Cone, Sphere, Pillar, Spar) |
Topmark |
Yellow “X” (St. Andrew’s Cross) – optional but usually fitted |
Light Color |
Yellow (if fitted) |
Light Rhythm |
Any rhythm NOT used by Cardinal, Isolated Danger, or Safe Water marks |
Identification: If you see a completely YELLOW mark, it’s a special mark. The yellow color immediately distinguishes it from all other mark types in the IALA system.
Common Uses for Special Marks
| Category | Specific Applications |
|---|---|
| Marine Infrastructure | • Ocean Data Acquisition Systems (ODAS) • Cables and pipelines • Outfall pipes and discharge points • Oil wells and platforms |
| Boundaries and Zones | • Traffic separation scheme boundaries • Anchorage area limits • Marine protected areas • Speed restriction zones • Exclusion zones |
| Aquaculture | • Marine farms (fish, oyster, mussel) • Aquaculture lease boundaries • Fish aggregating devices |
| Military and Recreation | • Military exercise areas • Naval gunnery ranges • Racing marks • Water skiing areas • Swimming zones |
| Navigation Features | • Spoil grounds (dredge dumping) • Mooring areas • Dead-end channels • Channel junctions (supplementary) |
Light Characteristics
Special mark lights are designed to be distinctive:
- Color: Always YELLOW when lit
- Rhythm: Must differ from other IALA marks to avoid confusion
- Common patterns:
- Fl(4) Y – Four yellow flashes (very common)
- Fl(5) Y – Five yellow flashes
- Fl Y – Single yellow flash
- Any distinctive yellow rhythm not used elsewhere
Why Fl(4) is Common:
Group flashing (4) is popular for special marks because no other mark with a WHITE light uses this rhythm, preventing confusion with cardinal, isolated danger, and safe water marks.
Navigating Near Special Marks
Navigation Procedure:
- Identify the yellow special mark
- Consult your nautical chart for the specific area or feature
- Follow any regulations or restrictions for that area
- Special marks do NOT indicate safe or dangerous water – they only mark special areas
Practical Examples
Example 1 – Cable Crossing:
Yellow special marks with X topmarks are positioned on either side of an underwater cable crossing. Charts indicate “Cable Area – No Anchoring.” Mariners should not anchor between or near these marks to avoid damaging the cable.
Example 2 – Aquaculture Zone:
A series of yellow can-shaped buoys with X topmarks outline a marine farm area. Charts indicate “Oyster Lease – Keep Clear.” Vessels should navigate around this marked area and not enter the aquaculture zone.
Example 3 – Military Exercise Area:
Yellow pillar buoys mark the boundaries of a naval gunnery range. Charts indicate “Military Exercise Area – Entry Prohibited When Active.” Mariners should check NOTAMs (Notices to Mariners) before entering.
Example 4 – Spoil Ground:
Yellow special marks indicate a dredge spoil dumping area. Charts show “Spoil Ground – Depths Variable.” Vessels should exercise caution as depths may be shallower than surrounding areas and subject to change.
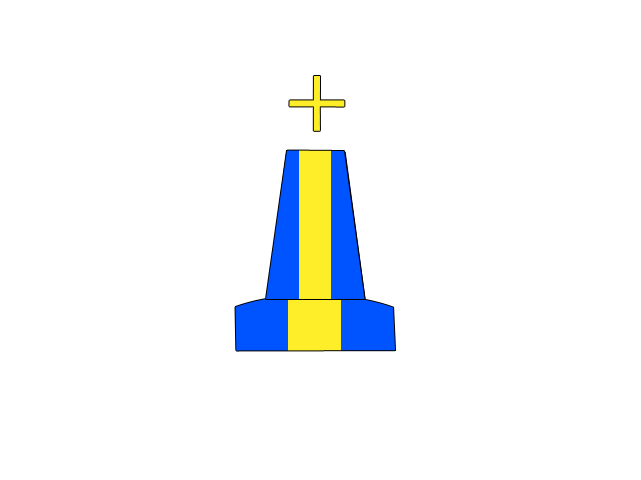
Difference from Emergency Wreck Marks
| Feature | Special Mark | Emergency Wreck Mark |
|---|---|---|
| Color | Solid Yellow | Blue and Yellow vertical stripes |
| Topmark | Yellow X | Yellow Cross (upright +) |
| Purpose | Mark special areas/features | Mark new uncharted dangers/wrecks |
| Urgency | Informational | High urgency warning |
| Duration | Permanent or long-term | Temporary until charted |
Important Note: Special marks do not indicate whether water is safe or dangerous. They only mark areas with special features. Always consult charts and publications to understand what the special mark indicates and what actions you should take.
Regional Variations
While the IALA system is standardized, the specific use of special marks can vary by region and country. Common variations include:
- Different countries may use special marks for different purposes
- Local regulations determine what requires a special mark
- Some areas have many special marks, others have few
- Always refer to local charts and sailing directions
Quick Reference Summary
All Mark Types at a Glance
Mark Type |
Colors |
Topmark |
Light |
Meaning |
Marker |
|---|---|---|---|---|---|
Lateral – Port |
Red |
Red Can |
Red (any) |
Keep on port when entering |
|
Lateral – Starboard |
Green |
|
Green (any) |
|
|
Cardinal – North |
Black/Yellow |
2 Cones Up |
White Q/VQ |
Pass NORTH of mark |
 |
Cardinal – East |
Black/Yellow/Black |
2 Cones Apart |
White Q(3)/VQ(3) |
Pass EAST of mark |
 |
Cardinal – South |
Yellow/Black |
2 Cones Down |
White Q(6)+LFl |
Pass SOUTH of mark |
 |
Cardinal – West |
Yellow/Black/Yellow |
2 Cones Together |
White Q(9)/VQ(9) |
Pass WEST of mark |
 |
Isolated Danger |
Black with Red bands |
2 Black Spheres |
White Fl(2) |
Danger below – keep clear |
 |
Safe Water |
Red/White vertical |
Red Sphere |
White Iso/Occ/LFl |
Safe water all around |
|
Special |
Yellow |
Yellow X |
Yellow (any) |
See chart for details |
|
Progress Check
Test your IALA Buoyage knowledge with the flip cards below randomly prompting questions and visual images. Study the image and decide on the action you would take and click the image to see if you got the right answer.. Click the buttons under answer to keep score and move to next question.
You can use your mobile to test your knowledge on this topic as well as many other marine related topics required for your Marine Master Oral interview.
Download the app from